 |
-
|
-
-
-
-
-
|
-
-
-
-
-
|

|
|
|
Nurgle
|
|
Difficulty
level: Medium
Materials Used: Masonite, Styrofoam balls
of varying sizes, epoxy putty, and sand. |
|
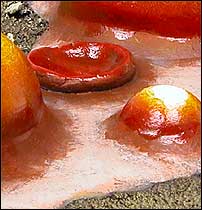
Nurgle is a truly foul Chaos God. What better way to show
off his putrescence than a land filled with rotting flesh,
cantankerous sores, and ripe, pus-filled blisters! Apart from
using the putty (which is used to hide the texture of the
Styrofoam balls and give the fleshy base some depth), this
is a fairly straightforward project. If you are feeling a
bit adventurous, try using some of those action figure tentacles.
Just make sure that you paint them in suitably Nurglish colors.
|
| |
|
 |
|
Cut the Masonite into an irregular
shape shape with a band saw. If you don't have a band
saw, use a hack saw or handheld jig saw. Do not use these
power tools if you are young and have no parental supervision! |
|
Bevel the edges to a 45-degree
angle with a belt sander. If you don't have a belt sander,
try a large file. |
|
Cut the following Styrofoam
balls in half with a hack saw or band saw: one 4"
(use one half), one 2" (use both halves), and one
3/4" (use both halves). |
|
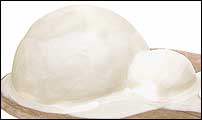
Use putty to cover the surface
of the balls to mask the fact that they're Styrofoam and
create a smoother texture. Put them aside and allow them
to set. |
|
Cover the Masonite base in
a millimeter-thick layer of putty. This should be irregular
and does not have to follow the contour of the Masonite. |
|
While this smooth, thin layer
is still soft, push the hemispheres into the putty. |
|
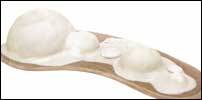
Roll more putty into thin
"worms" and wrap these around the base of the
"pustules." Using water and some pressure from
your fingers, smooth the joins between the sides of the
hemispheres and the putty base. If you've got huge fingers,
try using a smooth, rounded tool, such as a pen cap. |
|
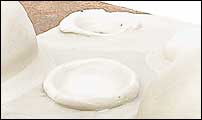
Finally, press some small
globs of putty into the base and, using water to keep
your fingers from sticking, push your finger around as
if you were making a small pit or bowl. A roll will naturally
form to represent a burst pustule. Flock the base with
sand, avoiding the putty areas. |
|
 |
 |
| |
|
 |
|
Spray the entire piece of
terrain with Chaos Black Spray Primer. |
|
Basecoat with a mix of Dwarf
Flesh and Chaos Black (4:1). This will create a muddy
grey color. |
|
Heavily drybrush with Dwarf
Flesh over the greyish basecoat. |
|
Mix Dwarf Flesh with Fortress
Grey and drybrush over the previous Dwarf Flesh layer. |
|
Mix Skull White with Dwarf
Flesh/Fortress Grey mix for a final drybrushed highlight. |
|
Heavily drybrush Terracotta
over the greyish basecoat. Make sure to stipple some of
this color onto the rotting flesh to blend the pustules
and the skin together to create the look of raw, enflamed
flesh. |
|
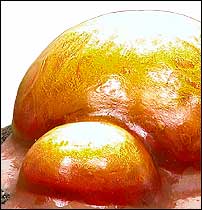
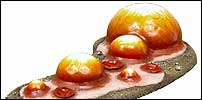
Heavily drybrush Blood Red
over all the pustules and ulcers. Stop at this step for
the ulcers! |
|
Drybrush Golden Yellow over
the Blood Red. |
|
Mix Golden Yellow and Skull
White together and drybrush the very tops of the pustules.
|
|
Paint a layer of Gloss Varnish
over each of the pustules and ulcers to make them glisten. |
|
Basecoat the sand with Scorched
Brown. Add some random splotches of Catachan Green. |
|
Drybrush Graveyard Earth over
the basecoat. |
|
Lightly drybrush Desert Yellow
over the Graveyard Earth in random patches. |
|
Pick out the small stones
and rocks with a light drybrushing of Bleached Bone. |
|
 |
 |

|
|
|
|
|
|
Khorne
|
Slaanesh
|
Nurgle
|
Tzeentch
|
|
|
 |
|
Home | About Games
Workshop | Job Announcements
| Contact Us | Introduction
Tour
GW
Worldwide | Help | Shopping and
Online Store | Investor Relations | Site Map
Privacy Policy | Terms
of Use
Copyright Games
Workshop Ltd 2000-2008
|
|
| Copyright © Games
Workshop Limited 2008 excepting all materials
pertaining to the New Line theatrical
productions: The Watcher logo, The Fellowship
of the Ring; The Two Towers; and The Return
of The King which are © MMVI New
Line Productions, Inc. All Rights Reserved. The
Lord of The Rings, The Fellowship of The
Ring, The Two Towers, The Return of The
King and the names of the characters,
items, events and places therein are trademarks
of The Saul Zaentz Company d/b/a Tolkien
Enterprises under license to New Line
Productions, Inc. and Games Workshop Ltd.
All Rights Reserved. Games Workshop, the
Games Workshop logo, Warhammer and the
Warhammer 40,000 device are either ®,
TM and/or © Games Workshop Ltd 2000-2007,
variably registered in the UK and other
countries around the world. All Rights
Reserved.
|
|
|
|