 |
-
|
-
-
-
-
-
|
-
-
-
-
-
|

|
|

|
|

|
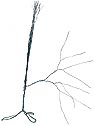
| THE
THREE TREES: The basic construction for each of the
three trees was the same. Mark took seventeen lengths of wire,
30 inches long and bent them in half, giving, thirty-four strands.
Holding these together, he was able to twist the bent end to
produce a loop big enough to fit three or four of his fingers.
The strands were then twisted together to form a trunk two or
three inches long, beginning at the loop. With the twists holding
the strands together, the loop could then be separated into
three loops and given a few twists to keep them separated. These
loops would eventually end up forming the thick roots of the
finished tree.
Now that the beginnings of the trunk and
roots were there, it was time to start on the branches of
the tree. The first branch was formed from eight strands of
wire, separated from the trunk and twisted together. After
an inch and a half of twisting, the branch was split into
two more branches, each made up of four strands. These branches
were treated in the same way as before twisted for a little
and then split again. The process continued until each branch
consisted of only one strand and couldn’t be separated
any further.
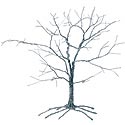
The trunk was twisted for about an inch
before another branch was separated off. The same process
that created the first branch was used again, with the branching
happening at slightly different lengths, to give a more irregular,
organic appearance to the tree. This process was repeated
at various different points along the developing trunk until
all the strands had become part of a branch, somewhere in
the tree. The branches became shorter as they approached the
treetop. Again, this was to create a more natural appearance
for the tree. The branches were kept fairly straight and flat
at this stage, to make it easier to combine them later on.
Mark followed the same procedure for each
of the other two trees, keeping the branches straight and
varying the length and position of the branches to make combining
the trees easier and the shape as organic as possible. With
the branching complete, the loops at the base of the trees
were twisted to form three roots for each tree.
|

|
|

|
|
|
|
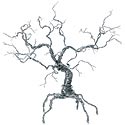
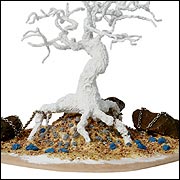
COMBINING
THE TREES: With the three trees prepared, Mark
placed them together and began to bind them to each other
with wire. Some of the branches were trimmed at this stage,
to better suit the appearance of the new, combined tree. Once
the trees were firmly bound together, Mark used pliers to
form the basic shape of the combined tree. This involved putting
a series of bends and twists in the tree trunk up to the point
where the branches split off. The branches themselves were
spread out into a more natural pattern and then given the
same treatment as the trunk.
As before, the roots were the last piece
of the combined tree to receive attention. In a normal tree,
the roots would be mostly under the ground and so would be
kept quite small and thin on the final model. In this case,
Mark wanted the Chaos tree to appear to be straining to break
free of the earth. That meant separating the roots into their
usual pattern before twisting them into a raised position,
more like legs than roots. Some of the roots were twisted
together to form thicker roots and to keep the arrangement
organic. The Chaos tree ended up with five roots out of the
original nine.
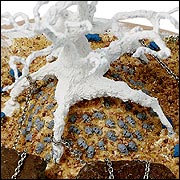
Even though it was made up of three separate
trees (that’s one hundred and two strands!), it didn’t
look thick enough. Mark decided to thicken the tree by winding
extra wire round the trunk, beginning by winding the wire
between the roots and then up and around the trunk. Most of
the strands were allowed to fall short of the branches, to
allow the thickness of the trunk to taper off towards the
top. The beginnings of the branches and the roots were thickened
in a similar way at the same time, but using shorter strands
of wire.
|
|
|
|
|
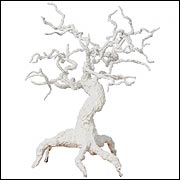
CREATING THE BARK:
The base was made from 6mm MDF in a roughly round
shape with at least one and a half inches clear between the
edge of the base and the roots. The edges were rounded off
and sanded to allow the finished piece to better blend with
the gaming table. The positions of the roots on the base were
then carefully marked. A blob of five-minute epoxy glue was
placed on each of the marks and the tree roots placed into
them to set.
In order to create the texture of bark,
the bare wire of the tree had to be covered by a layer of
filling material. The filler consisted of ready-mixed filler,
mixed with white glue until it became a thick, creamy paste.
The filler was brushed onto three of the branches first, working
from the trunk to the ends of the branches. By the time the
last of the branches was covered, the first was dry enough
for Mark to begin to texture the branches. The bark texture
was created by scratching lines into the surface of the tree
with a sculpting tool. It wasn’t necessary to texture
the branches right to the ends, as these tend to be fairly
smooth on real trees.
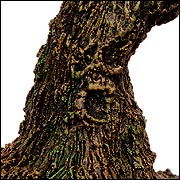
The texturing on the roots and trunks was
done in two layers. The first only has to cover the wire and
provide a good surface for the second layer to stick to. The
second layer was applied in the same way as the texturing
on the branches, and given the same bark effect. The texturing
on the trunk did have one unusual feature. The suggestion
of a face was added to the trunk to create the illusion that
the tree was almost alive. Care was taken to ensure that the
effect remained very subtle– this was meant to be a
tree, rather than some kind of creature.
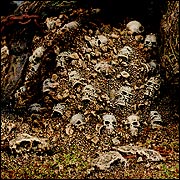
FINISHING THE
BASE: With the texturing on the tree dried, it
was time to turn to the base. In the original sketch, the
tree was surrounded by anchor-stones and random piles of bones.
In the final model, Mark created a mound under the tree, peppered
with the skulls of the dead. The mound was built up with scraps
of polystyrene, into which the skulls (from the plastic skeleton
box) were pushed and then glued. Blobs of the filler were
then used to make the base more uneven, like real earth. The
texturing on the base was finished off with a layer of sand
and gravel, glued on with white glue.
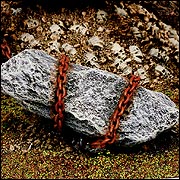
All that was left to attach was the anchor
stones. These were just some suitably craggy stones, taken
from a garden (slate is especially good for this). Each of
the three stones were wrapped in some light chain and glued
to the base with five-minute epoxy. The chains were then wrapped
round the tree roots and glued in place with superglue.
|
|
|
|
|
PAINTING THE MODEL:
To help hold the sand and gravel in place and create
a rougher, earthen surface, the base was given a layer of
texture paint. The paint had to be carefully applied to avoid
covering the skulls and stones. The entire model was then
undercoated with Chaos Black spray.
The tree itself was the first part of the
model to be painted, beginning by drybrushing the bark with
Scorched Brown paint. The bark was gradually lightened by
drybrushing the bark with coats of Dark Flesh and Bestial
Brown. The final coat to be added was a mixture of Bleached
Bone and Vomit Brown.
The earth around the base of the tree was
also drybrushed, this time with successive layers of Bestial
Brown, Vomit Brown and Bleached Bone. The skulls were included
in the painting of the earth but were then picked out with
a layer of Bleached Bone, followed by some detailing with
Skull White.
To make the rocks fit in with the style
of the model, and to provide them with a sense of scale, they
had to be painted too. Again, drybrushing was used to give
the rocks a weathered appearance. Codex Grey was used for
the basecoat, followed by Fortress Grey and Skull White.
Finally, the chains could be painted. Mark
wanted to create the effect of the chains being rusted by
weathering and time. He achieved this effect by drybrushing
the chains with thinned down Vermin Brown. He allowed some
of the paint to stain the rocks, as real rusting metal would
do when battered by years of rain. The model was then finished
off by adding a coat of flock to the base. See
the finished tree here...
|
|
|
|
Home | About Games
Workshop | Job Announcements
| Contact Us | Introduction
Tour
GW
Worldwide | Help | Shopping and
Online Store | Investor Relations | Site Map
Privacy Policy | Terms
of Use
Copyright Games
Workshop Ltd 2000-2008
|
|
| Copyright © Games
Workshop Limited 2008 excepting all materials
pertaining to the New Line theatrical
productions: The Watcher logo, The Fellowship
of the Ring; The Two Towers; and The Return
of The King which are © MMVI New
Line Productions, Inc. All Rights Reserved. The
Lord of The Rings, The Fellowship of The
Ring, The Two Towers, The Return of The
King and the names of the characters,
items, events and places therein are trademarks
of The Saul Zaentz Company d/b/a Tolkien
Enterprises under license to New Line
Productions, Inc. and Games Workshop Ltd.
All Rights Reserved. Games Workshop, the
Games Workshop logo, Warhammer and the
Warhammer 40,000 device are either ®,
TM and/or © Games Workshop Ltd 2000-2007,
variably registered in the UK and other
countries around the world. All Rights
Reserved.
|
|
|
|