|
-
|
-
-
-
-
-
|
-
-
-
-
-
|

|
|
|
|
|
The Space Marine conversions shown below
illustrate how to add battle damage to your models.
This page covers all sorts of damage, from projectile
weapons and close-combat wounds to damage inflicted
from an alien creature's death throes, and those repairs
that are made to keep the Space Marines in the fight.
|
|
| by
Ty Finocchiaro
|
|
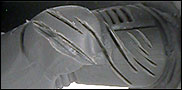
There are some aliens that can penetrate the massive
ceramite plates of powered armor that Space Marines
wear into battle. The alien menace knows as the Tyranids
are one such xenos species. Their scything talons
and lethal claws resemble power weapons in their ability
to slice through the thickest armor.
How It Was Done
Use an X-Acto knife to cut deep grooves into the plastic.
To make the gouged mark deeper or wider, make repeated
passes with the knife but keep to the same path. To
make the claw marks more convincing, make sure they
travel in the same direction.
|
|
|
|
|
| by
Rick Smith |
|
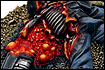
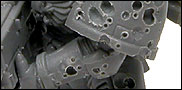
Rick, inspired by the art of Kev Walker (at the bottom
of the page), created this Space Marine that has been
the target of quite a bit of bolter fire. Power armor
in this state can really give your army the look of
being on an extended campaign where repairs have to
be postponed.
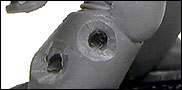
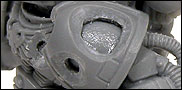
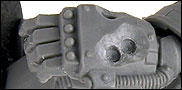
Bolters fire self-propelled, armor-piercing,
mass-reactive explosive missiles called bolts. These
detonate a split second after penetrating a target,
blasting it apart from within. With this in mind,
I added the massive craters in the Space Marine's
shoulder pad, power fist, chest eagle, and leg.
|
 |
|
|
How
It Was Done
Before assembling the Space Marine, you need to add
the craters. Start a bolter shell crater with the large
pin vise drill bit. Then, take an X-Acto knife to bevel
the sharp edge of the hole down to a 45-degree angle.
Beveling can be done by carving a circular path along
the hole edge, gradually working your way down to the
correct angle. For the shoulder pads, drill all the
way through the pad. Now, bevel as described above. |
|
| by
Dave Taylor |
|
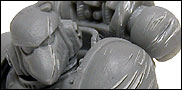
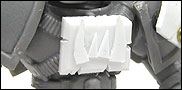
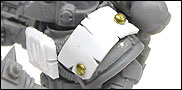
I wanted the Space Marines to look as if they had
to repair their armor on the fly while they also took
some small measure of revenge on the aliens who dared
to damage them in the first place.
How It Was Done
Assemble the Space Marine as normal but gouge out
damage in the areas that will receive the extra plating.
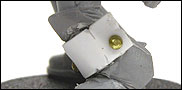
Next, cut out small rectangles of plasticard and "weather"
it with an X-Acto blade. Cut out thinner plasticard
for the teeth on the Space Marine's new chestplate.
Bend and glue the plasticard plates to the Space Marine
with superglue. Once the glue has dried, drill holes
into the plates and insert brass nails (available
at HobbyTown
USA) to finish the improvised look.
|
|
|
|
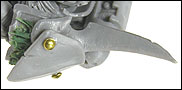
| This Space Marine scavenged
his "new" armor plates from the battlefield.
Not only are these plates added to protect the Space
Marine during the ongoing campaign, but the use of the
Ork Choppa and the Ork icon on his chest are attempts
at psychological warfare. The Ork glyph is Grim, which
means tough or nasty, and is often used by Ork Nobz.
This Space Marine now has the momentary mental edge
over any regular Boyz he will face. |
|
| by
Dave Taylor
|
|
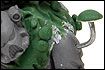
With his armor deeply scarred by acidic blood, this
Space Marine has torn the heads off two Tyranid Rippers
and the armored plates from some larger Tyranid creature
to affect repairs. He has hastily bolted on these
new armor plates onto his existing power armor to
protect himself on his weakened flank.
This conversion could also work well for Ordo Xenos
Kill Teams, Ultramarine squads that have faced the
Tyranid onslaught and survived, trophies and totems,
or possibly a very barbaric Space Marine Chapter of
your own devising.
How It Was Done
First, use a pin vise to add pock marks as described
in the Tyranid Bio-Acid Space Marine
section below.
|
|
|
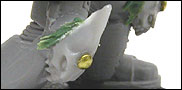
Next, apply green stuff to create
torn strips of flesh that will be covered by
the chitinous plates. Press the Tyranid plastics
onto the green stuff before it dries or wait
until it dries and glue them on with superglue.
|
|
|
|
| Use a pin vise to drill holes
into the Tyranid plates and insert brass nails (available
at HobbyTown
USA) into the holes. |
|
| by
Rick Smith
|
|
The ferocity of battle does not allow the Space Marines
a lot of time to make repairs to their power armor.
This Space Wolf has taken it upon himself to make
his limb combat-ready once more. Many Space Marines,
when in desperate situations or far from friend and
battle barge, fall back on more primitive ways of
bringing death to the enemy – especially when
they are wounded in some manner.
How It Was Done
Assemble a Space Wolf Grey Hunters Sergeant as normal,
except for the arms. Cut the right arm with an X-Acto
knife above the elbow pad, pin it, and reassemble
it so that it is bent more to the right. Now for the
left arm.
|
|
|
Cut off the hand from the Space
Wolf power sword arm and drill out a hole in
the stump with a large drill bit. Cut the blade
of the power sword from the hilt and "fracture"
it with an X-Acto blade.
|
|
|
|
| Shave off the power conduit
on one side of the sword and glue the blade to the remainder
of the Space Marine's arm. Wrap a "worm" of
green stuff around the arm and sword. Flatten the green
stuff with the flat of the sculpting tool and then use
the blade of the sculpting tool to create lines so it
looks like a strap or rope (make sure you keep the sculpting
tool wet...unless you want to attach it to the model). |
|
| by
Stuart Spengler
|
|
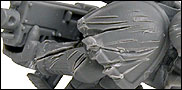
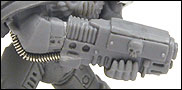
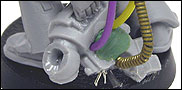
Stuart created a Space Marine that has some sort
of Techmarine-developed prosthetics and equipment
to repair a hearty dose of battle damage.
"The idea I went for is kind of like Mega Man.
These Space Marines are wearing some burly armor,
so why aren't their guns just part of the armor?"
Because...because...the Emperor said so!
How It Was Done
Assemble a plastic Space Marine as normal, but remove
the right hand at the wrist. Leave off the plastic
Space Marine backpack. Attach a plastic Chaos Plasma
Gun in place of the hand and glue a Skaven Poison
Wind Globadier Backpack to the Space Marine's back.
Add the Steam Tank Vent bit to the top of the backpack
to finish this powerplant off. Use guitar wire to
create cables that run from the Space Marine's backpack
to the Plasma Gun arm.
|
|
|
Finally, use the helmeted head
from the Space Marine Vehicle Accessory sprue
to "tech-up" the overall appearance
of this Space Marine conversion.
|
|
|
|
|
| by
Rick Smith
|
|
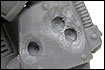
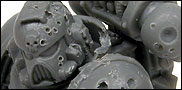
When fighting a Hive Fleet, it goes without saying
that those battling the Tyranids will be up against
all manner of biological horrors. Some mutant swarms
have a powerful, corrosive bio-acid instead of normal
circulatory ichor. When wounded, these Tyranids can
injure those individuals unlucky enough to be nearby.
The larger the genus, the stronger the acid. This
Space Marine has been hit by a gout of acid –
most likely from a mortal wound he inflicted on his
enemy.
This conversion for Tyranid bio-acid could also work
for caustic environments
such as planets whose atmosphere has a high acid content.
|
|
|
How
It Was Done
Use a pin vise and drill bits of varying diameter
to drill out pock marks in the armor. Keep the
holes shallow and pick a "splash-zone"
and keep your marks in that area of the Space
Marine's armor.
|
|
|
|
| For really small acid burns,
stick a fabric pin into the plastic and twist it around
in a circular motion. Just make sure you watch your
fingers! |
|
| by
Dave Taylor
|
|
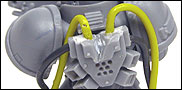
The next two conversions were very straightforward
and represent something you might see if a Techmarine
was a part of the strike force that these two Space
Marines were a part of. Care has obviously been taken
to reconnect essential components to the power armor
much like the other case shown below
where the backpack has been temporarily welded to
the legs of the Space Marine.
These are easy conversions to accomplish with only
minor cutting and drilling required.
|
|
|
How
It Was Done
Assemble the Space Marine sans backpack. Position
the left arm with a backwards swing and cut
the first segments off of his fingers to show
him curling his fingers around the backpack.
|
|
|
|
| Use an X-Acto knife to hack
and carve up the backpack so it appears damaged. Glue
the broken backpack to the fingers of the Space Marine.
Use guitar wire and plastic-coated wires to link the
backpack to the back of the power armor. Use green stuff
to cover up the hole in the backpack and use varying
lengths of wire to dangle out of the broken backpack. |
|
| by
Dave Taylor
|
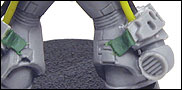
|
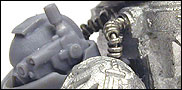
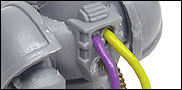
This Space Marine has been repaired in a more permanent
manner. Techmarines have applied a sanctioned field-repair
to this Space Marine's backpack by welding the damaged
thermal waste distributors to the legs of this warrior.
How It Was Done
Assemble the Space Marine model as normal, but leave
off the backpack so that it can be converted more
easily. Use an X-Acto knife to cut the top portion
of the backpack free from the bottom half. Cut the
top portion of the backpack in half and glue one half
to each leg. Use small, thin strips of green stuff
to create welds for the jury-rigged distributors.
|
|
|
Use a pin vise to drill holes
into the piece of the backpack to hold the wires.
Use superglue to attach the plastic-coated wire
to the holes in the backpack. Do the same for
the distributor casings.
|
|
|
|
|
|
 |
|
Home | About Games
Workshop | Job Announcements
| Contact Us | Introduction
Tour
GW
Worldwide | Help | Shopping and
Online Store | Investor Relations | Site Map
Privacy Policy | Terms
of Use
Copyright Games
Workshop Ltd 2000-2008
|
|
| Copyright © Games
Workshop Limited 2008 excepting all materials
pertaining to the New Line theatrical
productions: The Watcher logo, The Fellowship
of the Ring; The Two Towers; and The Return
of The King which are © MMVI New
Line Productions, Inc. All Rights Reserved. The
Lord of The Rings, The Fellowship of The
Ring, The Two Towers, The Return of The
King and the names of the characters,
items, events and places therein are trademarks
of The Saul Zaentz Company d/b/a Tolkien
Enterprises under license to New Line
Productions, Inc. and Games Workshop Ltd.
All Rights Reserved. Games Workshop, the
Games Workshop logo, Warhammer and the
Warhammer 40,000 device are either ®,
TM and/or © Games Workshop Ltd 2000-2007,
variably registered in the UK and other
countries around the world. All Rights
Reserved.
|
|
|
|