|
-
|
-
-
-
-
-
|
-
-
-
-
-
|

|
|
|
|
The Space Marine conversions on this page represent
some of the ways that extreme environments can damage
the protective armor of the Imperium's best fighters.
You may have noticed that there are fewer environment-driven
conversions than there were on the combat
damage page. This lack isn't because we were short
on ideas. No, the fact is that the very nature of
power armor allows its occupant to survive in the
harshest conditions – even the frozen void of
space. Still, we were able to think of a few.
|
|
| by
Bryan Barnes
|
|
A Space Marine's power armor is sealed against vacuum,
but the air inside can decompress explosively if the
seals are compromised. They can break when put through
the extreme forces involved in combat – like
a bolter shell to the chest. Though a Space Marine
can go without air for some time (courtesy of his
various genetically altered implants), explosive decompression
will still inflict considerable trauma if he accidentally
holds his breath.
How It Was Done
Assemble a normal Space Marine model, but substitute
an Assault Marine's legs and a Space Marine Biker's
left arm. Arch the back to suggest internal bursting
and other trauma. Position the arms to look like they
are flailing in reaction to the decompression.
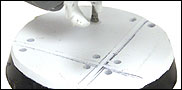
Cut out a small piece of plasticard to fit the top
of a 25-mm round base. Use a pin vise and a woodcarving
tool with a V-gouge to create the deck plating. Drill
a hole in the Space Marine's foot and a corresponding
hole in the base. Use superglue to glue a paper clip
piece to hold the model in space as if it had just
floated off the deck of a battlecruiser.
|
|
|
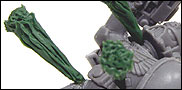
Add the air jets last. Pick
three seals on the Space Marine's armor that
look like good candidates for failure. Use a
pin vise to make a shallow hole in each of these
locations.
|
|
|
|
| Clip out three 1/2"-long
pieces of paper clip and add green stuff to each. Use
your fingers to shape the putty into an ice-cream-cone
shape but leave plenty of metal sticking out of the
bottom of the putty. Use a sculpting tool to make shallow
lines going up while "plucking" the putty
into little fingers of gas. Let these dry overnight
and then clip them down to size before gluing them into
the holes in the Space Marine. |
|
| by
Rick Smith |
|
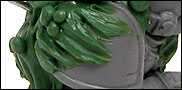
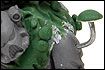
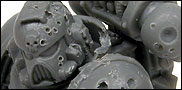
Some planets hold life forms that are so persistent
and pervasive that even Space Marine Chapters are
ill-prepared for combat in these places. What if a
planet's flora, spurred by some type of celestial
phenomenon, grew at a highly accelerated rate? A world
covered by fungi, molds, and bacterial slimes would
prove an interesting battlefield. Especially when
they are growing so fast that to stand still is to
become a petri dish.
How It Was
Done
Assemble the Space Marine in a hunched position. Cut
off one or both of the exhaust ports. Leave off one
shoulder pad. Spread large blobs of green stuff over
portions of the model, especially the back of the
Space Marine and any gaps that resulted from assembling
the model in a stooped posture.
|
|
|
|
|
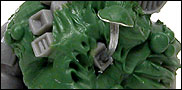
Use a sculpting knife and pin to add detail to the
putty (make sure to keep your tools wet to prevent
the putty from sticking to the tool). Roll the green
stuff into small balls of varying size and apply these
to the putty that already covers the Space Marine.
Roll more small putty balls and then flatten them
on a thin piece of paper (the blobs should be slightly
rounded since they're going to be mushroom caps).
Allow these to set and then cut them free from the
paper to form mushroom caps. Use a thin paperclip
for the mushroom stalks.
Use a pin vise to drill holes into the Space Marine
and then insert the paperclip stalks into place with
a drop of superglue. Put a drop of superglue on the
tip of the exposed paperclip for the mushroom cap.
|
|
| by
Rick Smith
|
|
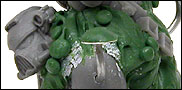
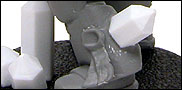
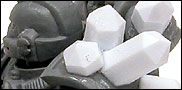
As slight twist on the fungi-covered Space Marine
shown above, we included this Space Marine that has
become encrusted by annoying, rapidly forming crystalline
growths. This conversion was a really simple one to
complete as all you really need are special pieces
of plastic rod and your trusty X-Acto knife.
How It Was Done
Cut each side of a hexagonal plastic rod (Plastruct
brand – available at HobbyTown
USA) at a 45-degree angle. These cuts form the
point of your crystal. Next, cut the plastic rod to
a desired length.
|
|
Dip the flat end of the crystal in superglue
and press it to the Space Marine's shoulder
pad or other somewhat-flat surface. If you
wish to glue a crystal to a round surface,
carve the flat end with an X-Acto knife so
it's concave.
|
|
|
|
|
| by
Rick Smith
|
|
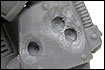
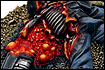
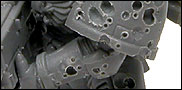
Some planetary atmospheres are so brutal and unforgiving
that even a Space Marine's protective armor can't
stand up to the harsh elements of such an environment.
Worlds with acid-vapor clouds are known even in the
Solar System – the galaxy must be littered with
similar planets. These clouds and other harsh chemicals
could eventually pit and dissolve even power armor
blessed with the strongest holy unguents applied by
the Chapter's Techpriests.
This conversion for caustic environments could also
work for Tyranid
bio-acid, as these xenos sometimes have a powerful
corrosive agent instead of normal blood.
|
|
|
How
It Was Done
Use a pin vise and drill bits of varying diameter
to drill out pock marks in the armor. Keep the
holes shallow and pick a "splash-zone"
and keep your marks in that area of the Space
Marine's armor.
|
|
|
|
| For really small acid burns,
stick a fabric pin into the plastic and twist it around
in a circular motion. Just make sure you watch your
fingers! |
|
|
 |
|
Home | About Games
Workshop | Job Announcements
| Contact Us | Introduction
Tour
GW
Worldwide | Help | Shopping and
Online Store | Investor Relations | Site Map
Privacy Policy | Terms
of Use
Copyright Games
Workshop Ltd 2000-2008
|
|
| Copyright © Games
Workshop Limited 2008 excepting all materials
pertaining to the New Line theatrical
productions: The Watcher logo, The Fellowship
of the Ring; The Two Towers; and The Return
of The King which are © MMVI New
Line Productions, Inc. All Rights Reserved. The
Lord of The Rings, The Fellowship of The
Ring, The Two Towers, The Return of The
King and the names of the characters,
items, events and places therein are trademarks
of The Saul Zaentz Company d/b/a Tolkien
Enterprises under license to New Line
Productions, Inc. and Games Workshop Ltd.
All Rights Reserved. Games Workshop, the
Games Workshop logo, Warhammer and the
Warhammer 40,000 device are either ®,
TM and/or © Games Workshop Ltd 2000-2007,
variably registered in the UK and other
countries around the world. All Rights
Reserved.
|
|
|
|